Future Basics/ How it works
Client guide · Future Basics Client Hub

From a screenshot to a sample.

Your hub is one private room for every product you develop with us: start a tech pack from a photo, let the assistant draft it, submit it, approve the finished version, pay the sample deposit, and follow sampling — all in one place, built for your phone.

01Add your design, a sketch, a photo or a screenshot of what you want made.
02The assistant builds the tech pack in about a minute. You check it and submit. First one free; then $48 a pack or $100 a month.
03Future Basics finishes it and publishes v1. You approve and sign.
04You get a quote and a deposit invoice. Pay it and sampling begins.
Step by step

Starting a tech pack

Step 01

Sign in — or start without an account

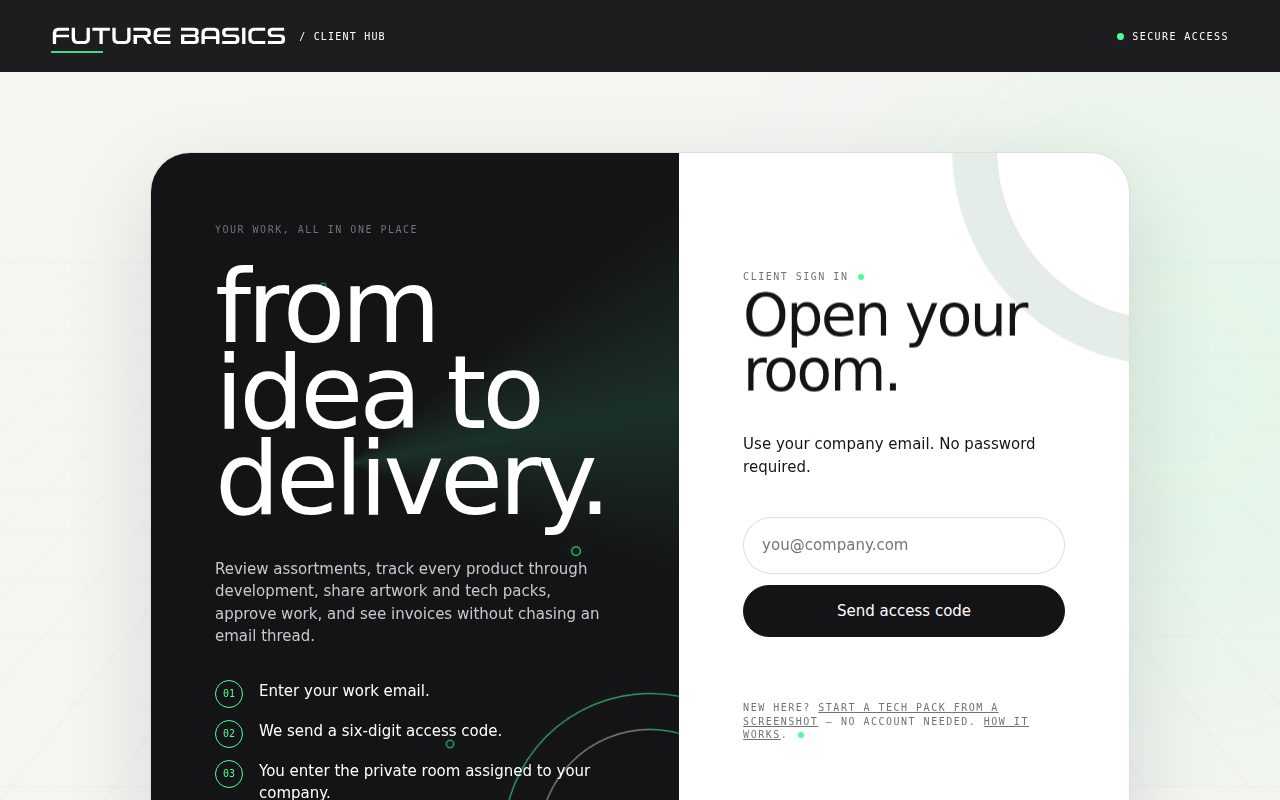
Your room is private to your company. Enter your work email and we send a six-digit code. There are no passwords.

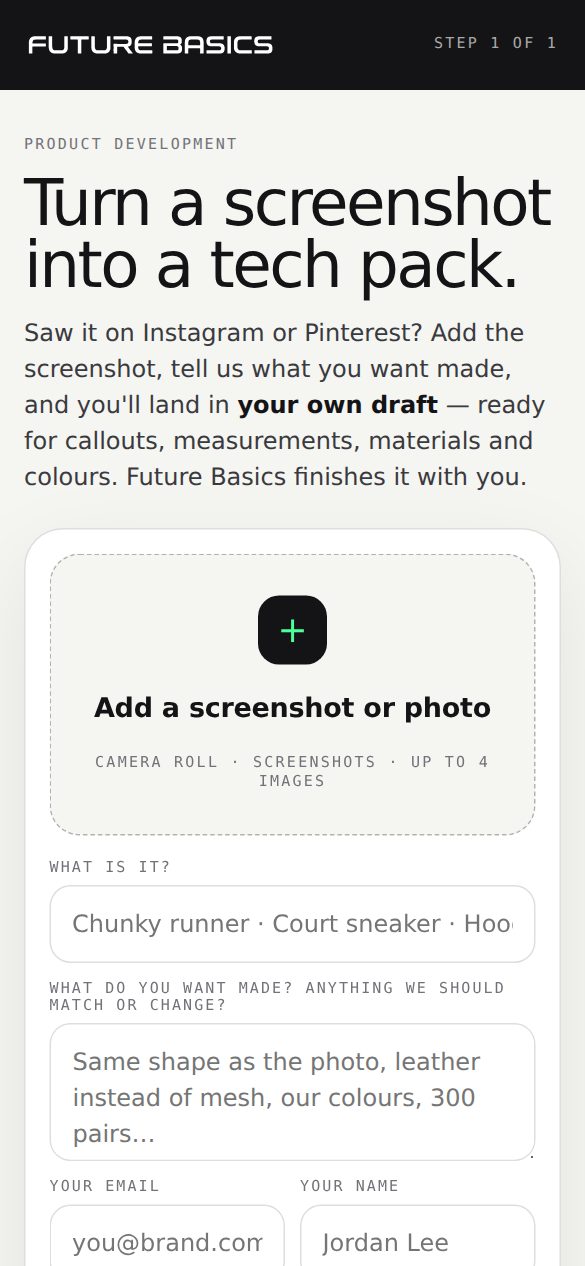
New to Future Basics? You do not need a room first. Open hub.thefuturebasics.com/start on your phone, add a screenshot and your email, and your room is created around your first tech pack.

Tip: save the hub to your phone's home screen. Everything here is designed for a phone first.
The client hub sign-in: enter your work email, receive a six-digit code
Sign in with a code
The start page on a phone: add a screenshot or photo
Start without an account
Step 02

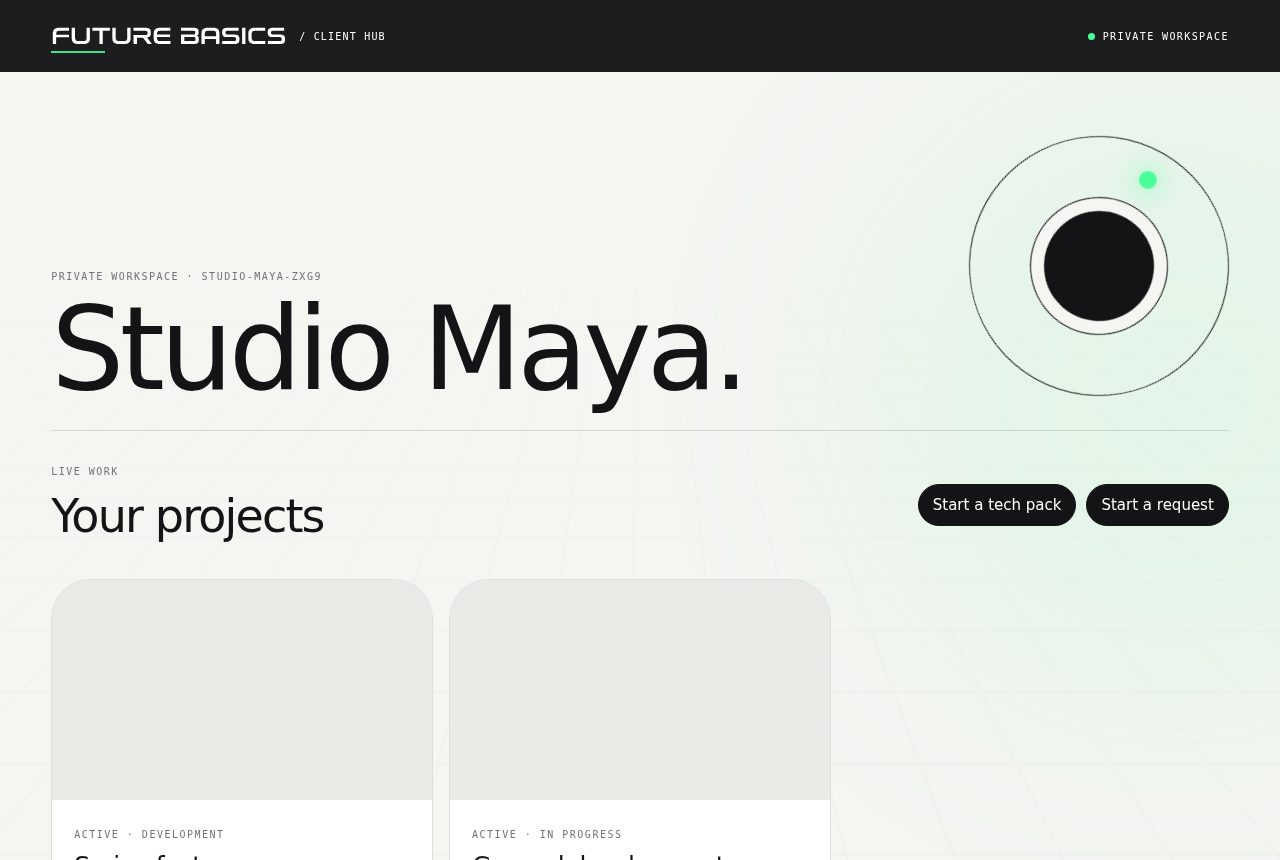
Press “Start a tech pack”

From your projects page, press Start a tech pack. Inside a project, the same button sits in the side bar, which also lists every product, the quote and deposit, messages and files.

Use Start a request for anything that is not a new product: artwork, a change to a product in development, or a question.

The projects page with the Start a tech pack button
Your projects
Step 03

Add a screenshot, choose a project

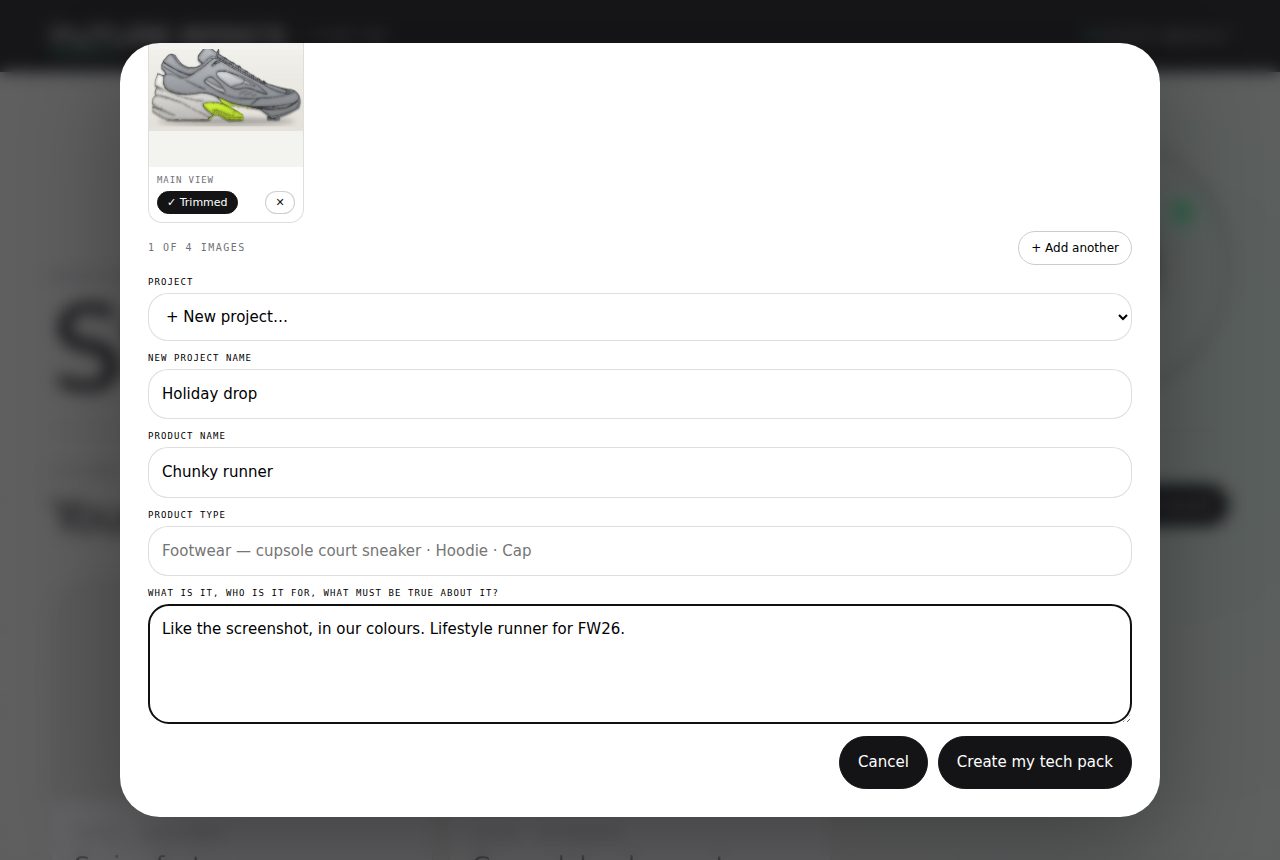
Saw it on Instagram or Pinterest? Screenshot it. App bars and captions are trimmed automatically; the product is what we keep. Add up to four images — the first is the main view.

  • Pick one of your projects or type a name to create a new one.
  • Give the product a working name. Everything else is optional.
  • Wrong file? Press the × on its thumbnail. Once you are in the editor, the × in the photo's corner swaps it.
  • No photo? Press Create blank draft and fill the pack in yourself.
The Start a tech pack dialog with a trimmed screenshot, a new project name and a product name
Photo in, project chosen
Step 04

The assistant builds your tech pack

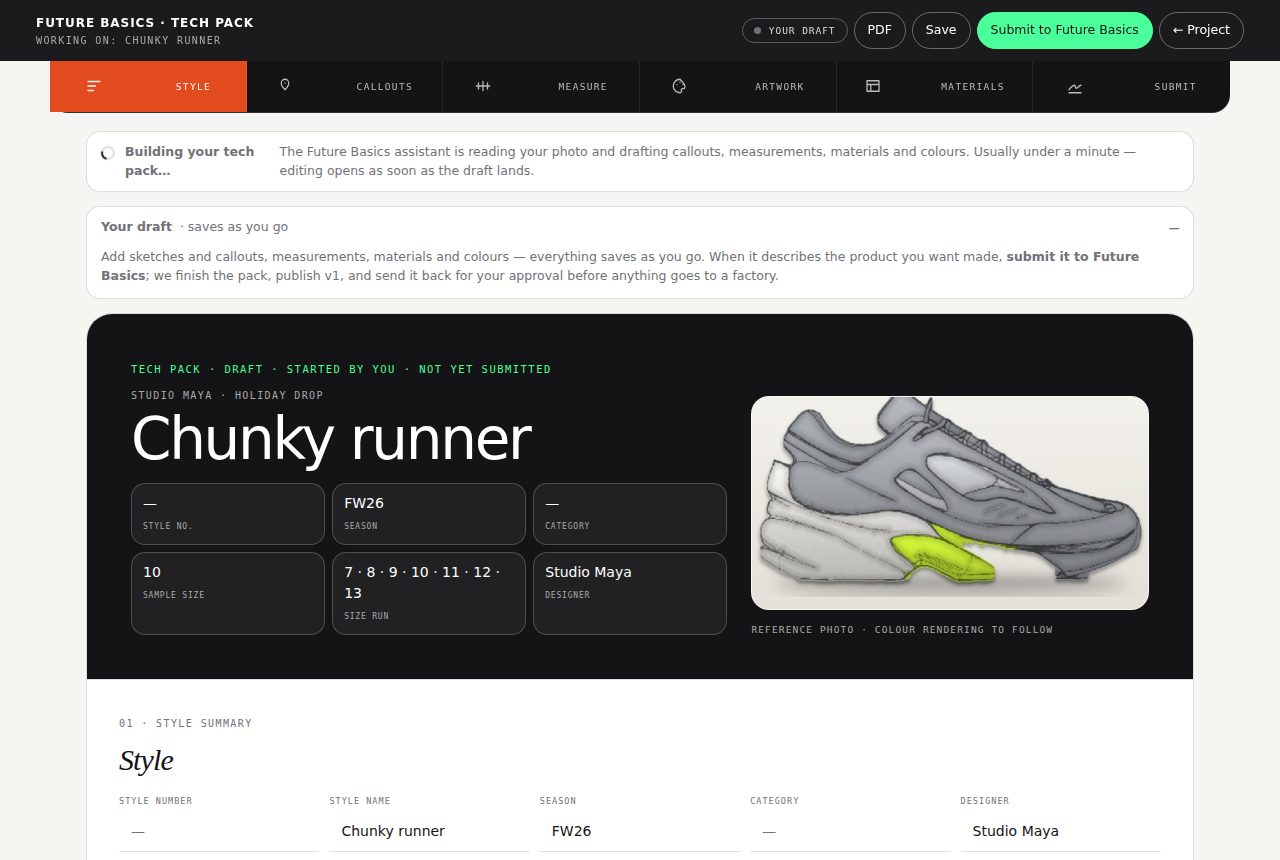
You land in your draft straight away with the banner Building your tech pack…. For about a minute the editor is read-only while the assistant reads the photo and drafts callouts, measurements, materials and colours; it unlocks the moment the draft lands.

If the photo cannot be read — nothing recognisable in frame, too small, too blurry — you are told why, with a Try again button and the option to swap the photo. We are notified too.

The editor with the Building your tech pack banner
Building your tech pack…
Step 05

Check the callouts

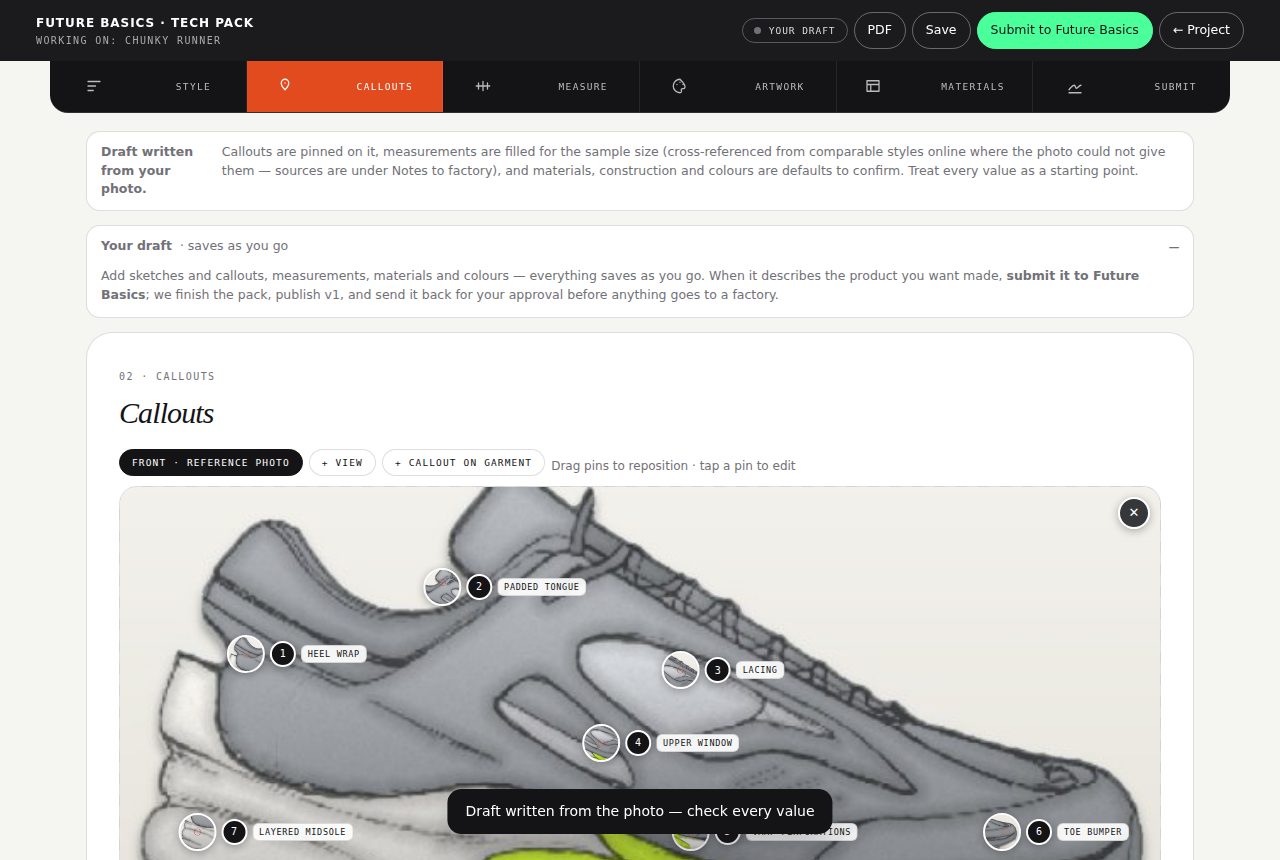
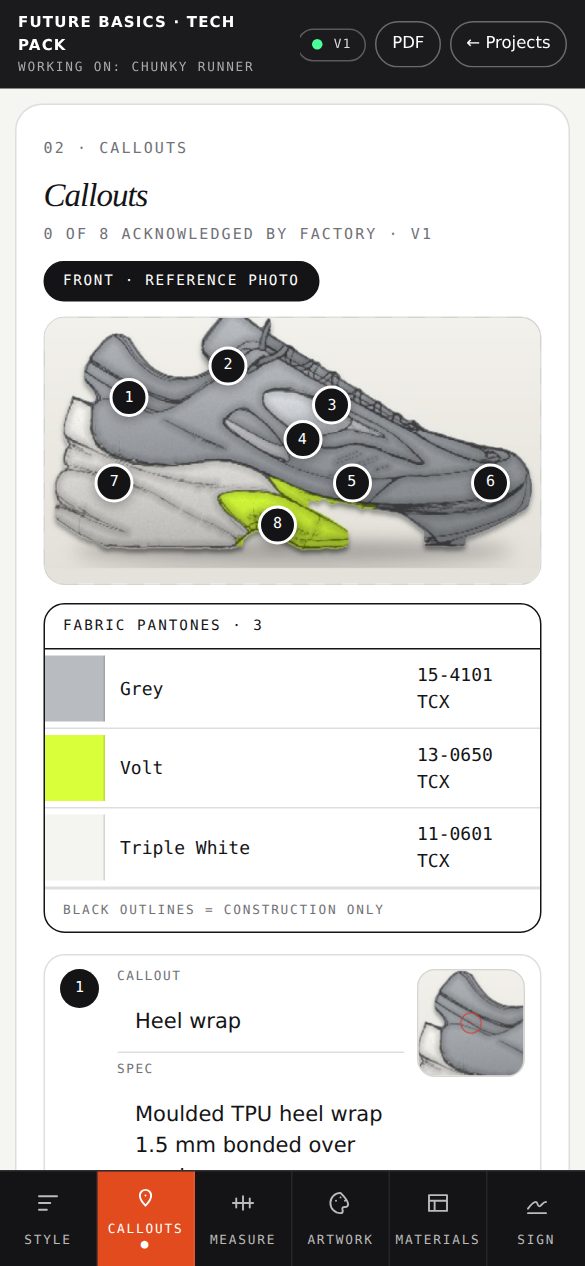
Callouts are the details a factory must get right. The assistant pins them on your photo — usually eight to twelve — each with a cropped close-up, a spec and a note to the factory.

  • Tap a pin or a card to edit it. Drag a pin to move it.
  • Add your own with + Callout on garment, then tap the spot.
  • Everything saves as you go.
Callouts pinned on the photo with detail crops
Callouts
The callouts tab on a phone
On your phone
Step 06

Measurements, materials, colours

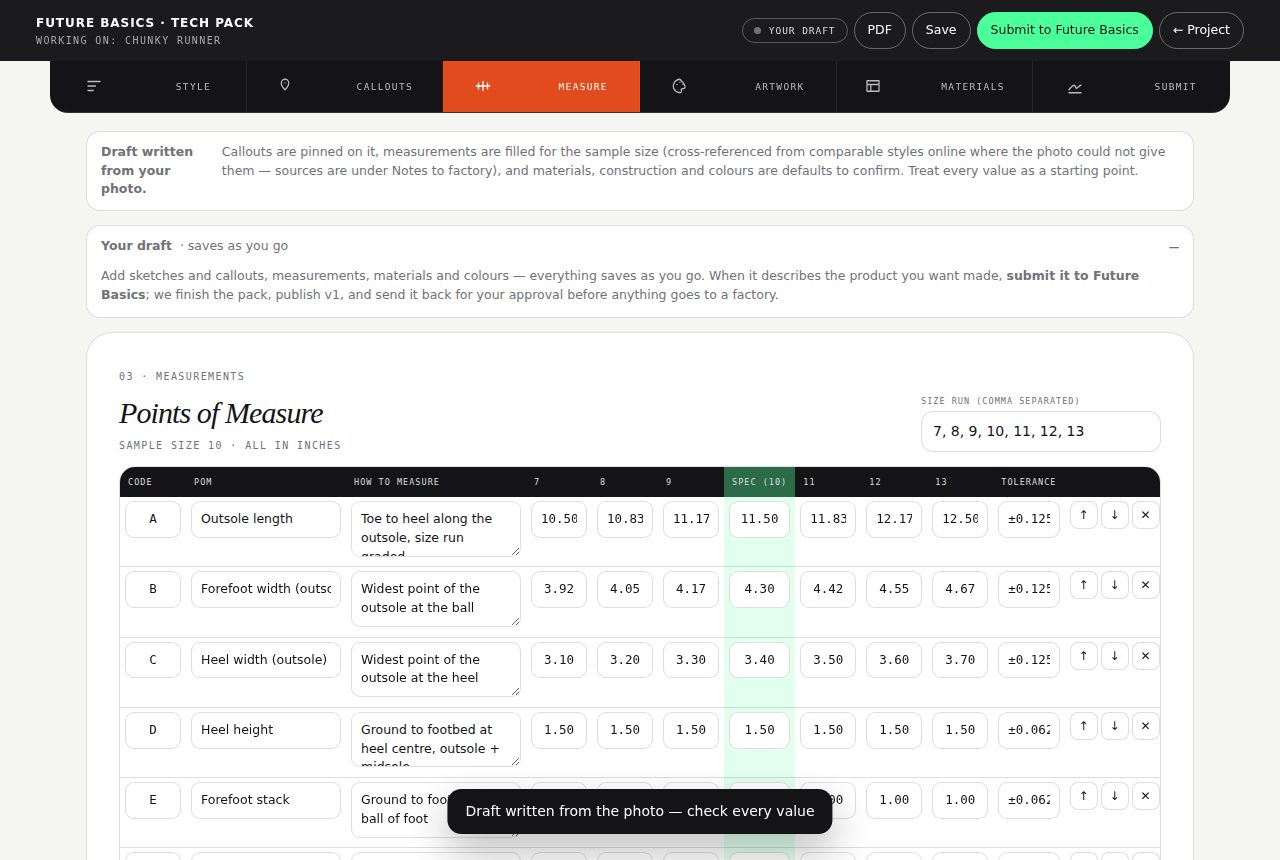
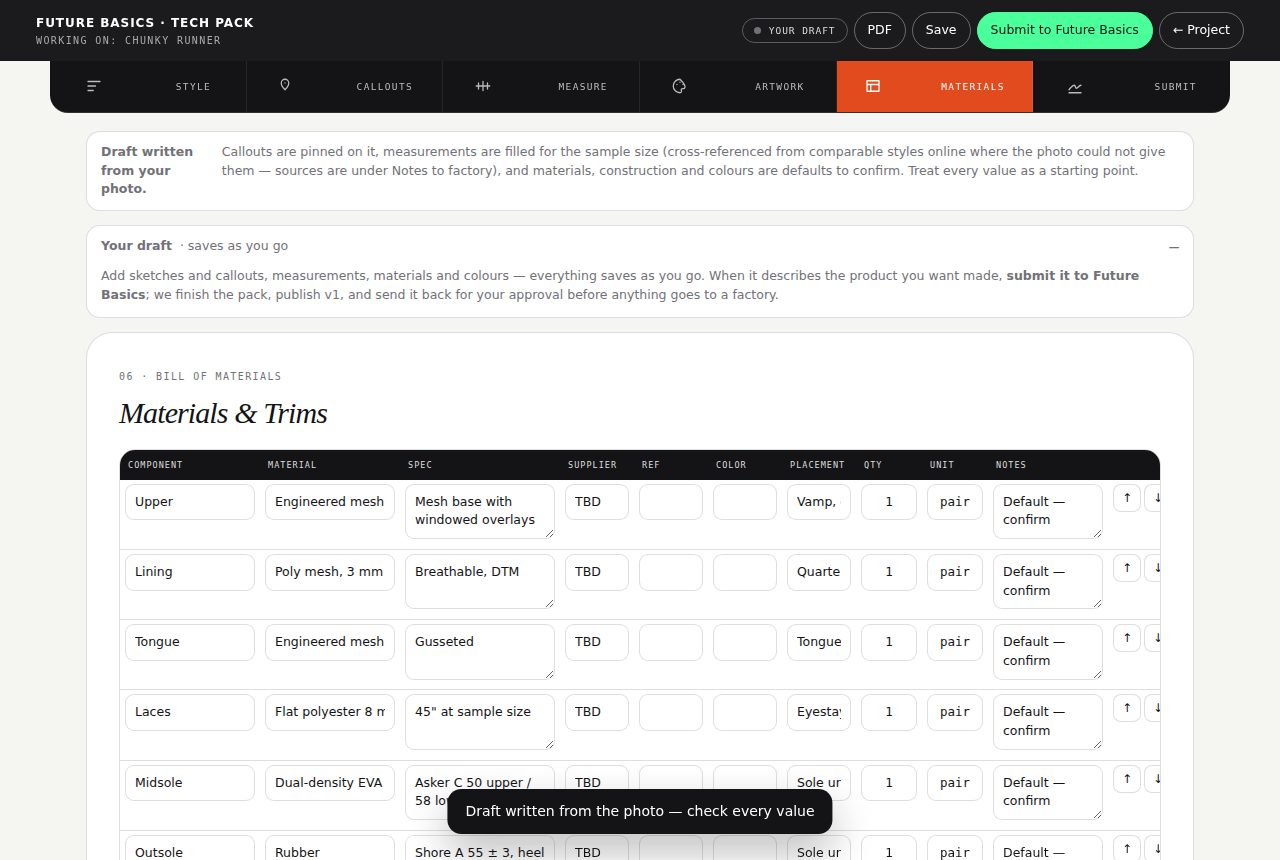
The assistant fills the measurement table for your sample size and grades it across the size run, drafts materials and trims with best-practice defaults, lists construction steps, and reads the colours off the photo with Pantone references.

When the photo cannot give a measurement, the assistant looks the style up online — retailer listings, size charts, lab measurements of the same or comparable products — fills the row from what it finds, and lists the sources under Notes to factory. Products with no standard template get their points of measure proposed the same way.

Every value is a starting point. Change anything; what you type wins.

Points of measure filled for the sample size and graded
Measure
Materials and trims table
Materials
Step 07

Submit to Future Basics

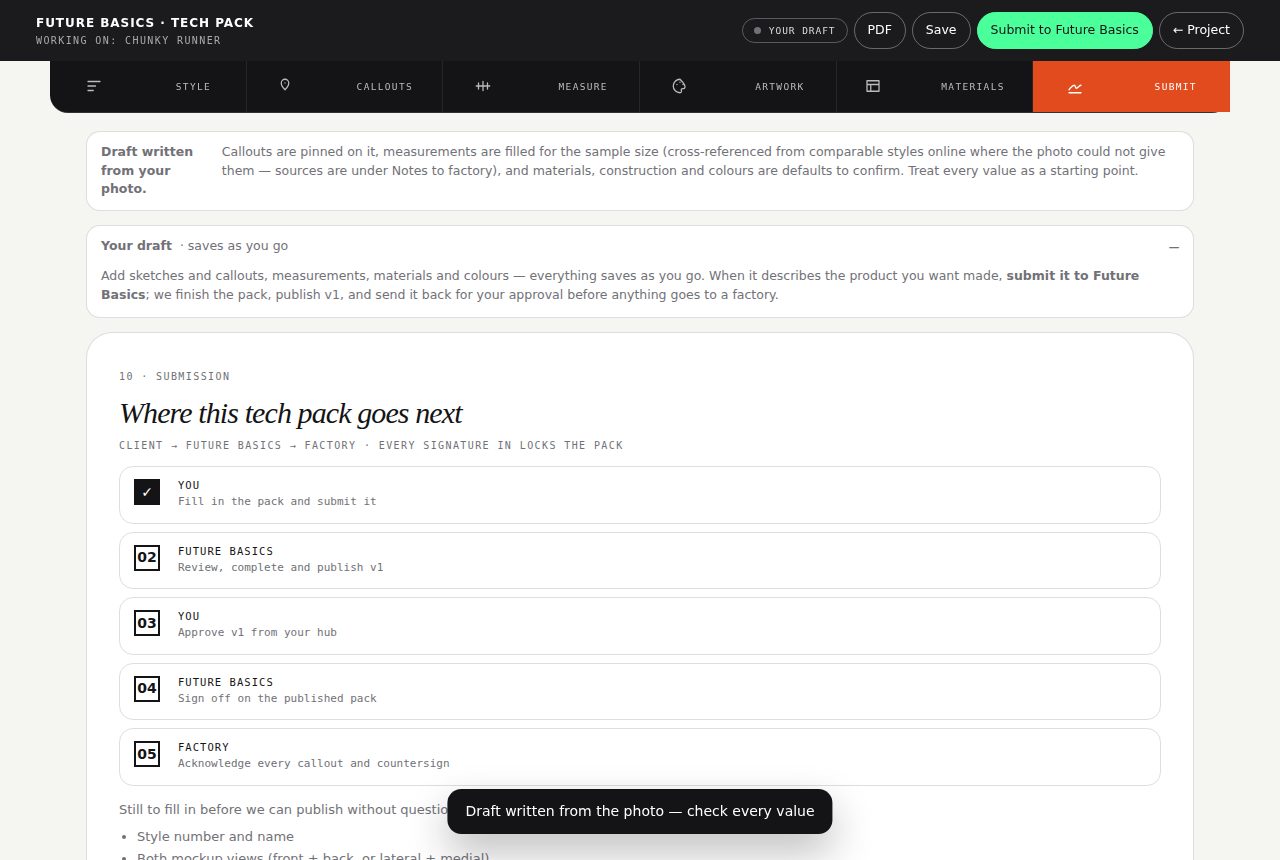
When the draft describes the product you want made, press Submit. The Submit tab shows what is still thin; you can submit anyway and we fill the gaps with you.

While we work on it the draft is read-only. Need to change something? Message us in the project thread and we hand it back.

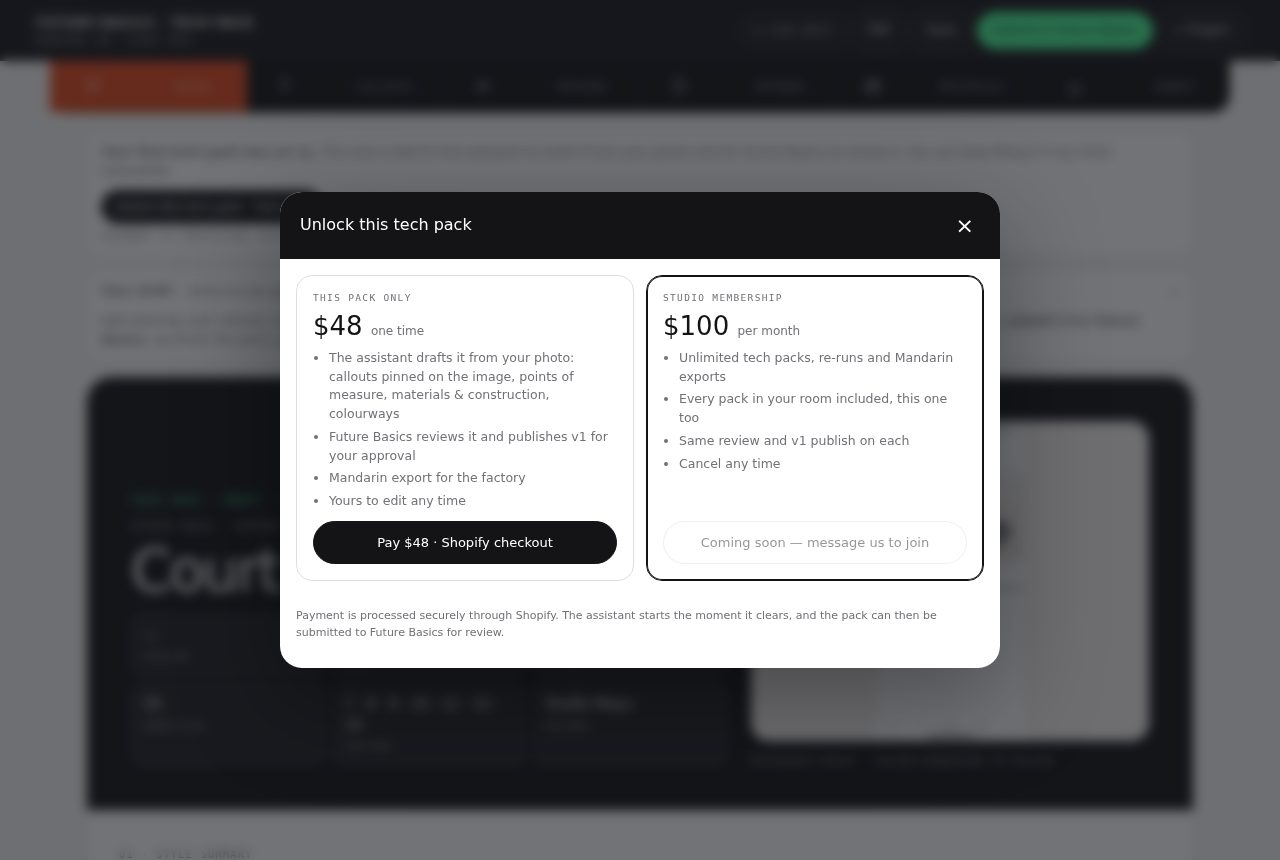
Your first tech pack is on us. From the second one, the assistant and Submit unlock for $48 a pack, or $100 a month for unlimited packs with the studio membership. The choice opens right there; payment is a Shopify checkout showing your photo, and the pack unlocks the moment it clears. Filling a draft in by hand is always free.

The Submit tab showing where the tech pack goes next
Where it goes next
The unlock choice: this pack for $48 or the studio membership for $100 a month
Unlocking a later pack
After you submit

Review, approval, deposit, sample

Step 08

We publish v1 — you approve and sign

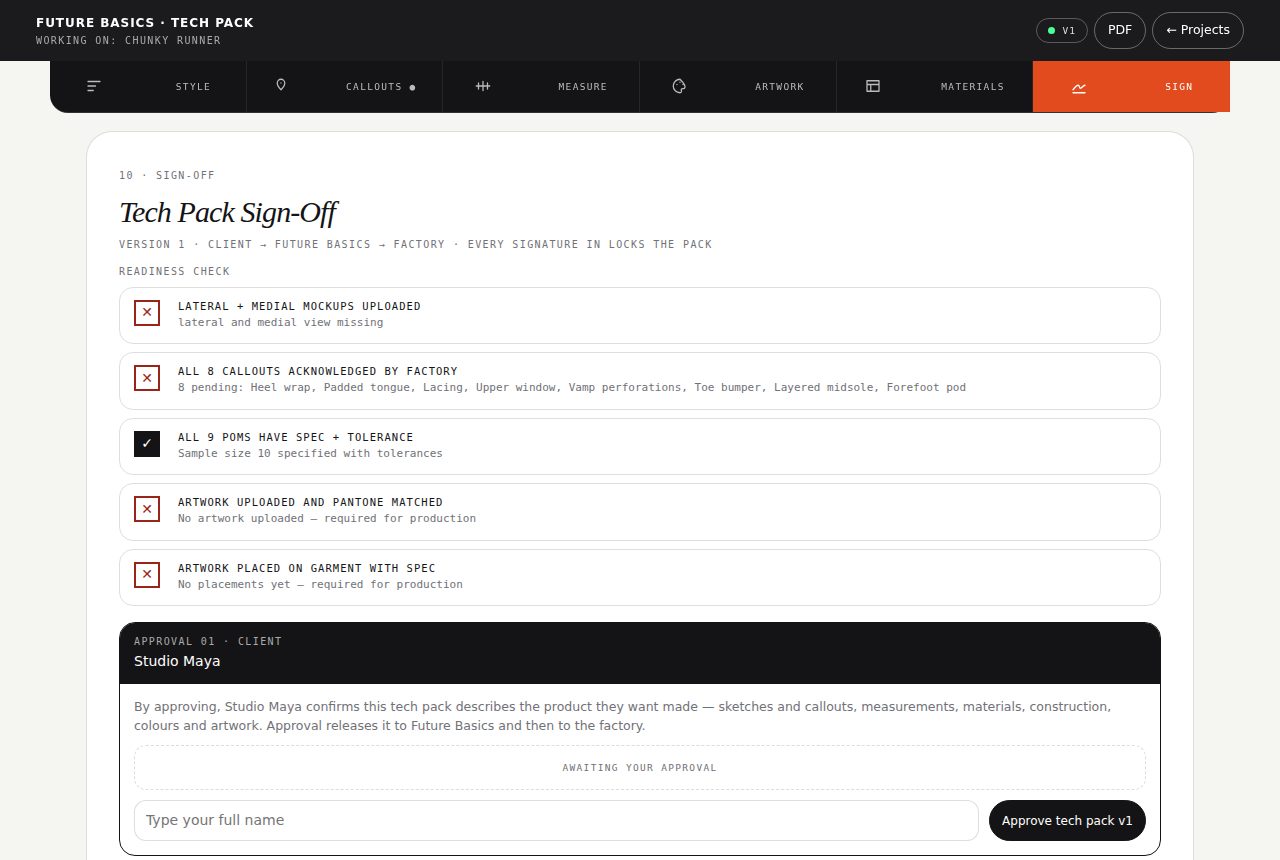
Future Basics reviews your draft, completes it and publishes version 1 to your room. You get an email. Open the pack, go to Sign, read it through, type your full name and press Approve.

Your approval is your signature. It confirms the tech pack describes the product you want made and releases it to Future Basics, then to the factory.

The Sign tab with the client approval form for version 1
Approve v1
Step 09

Approve the quote, pay the sample deposit

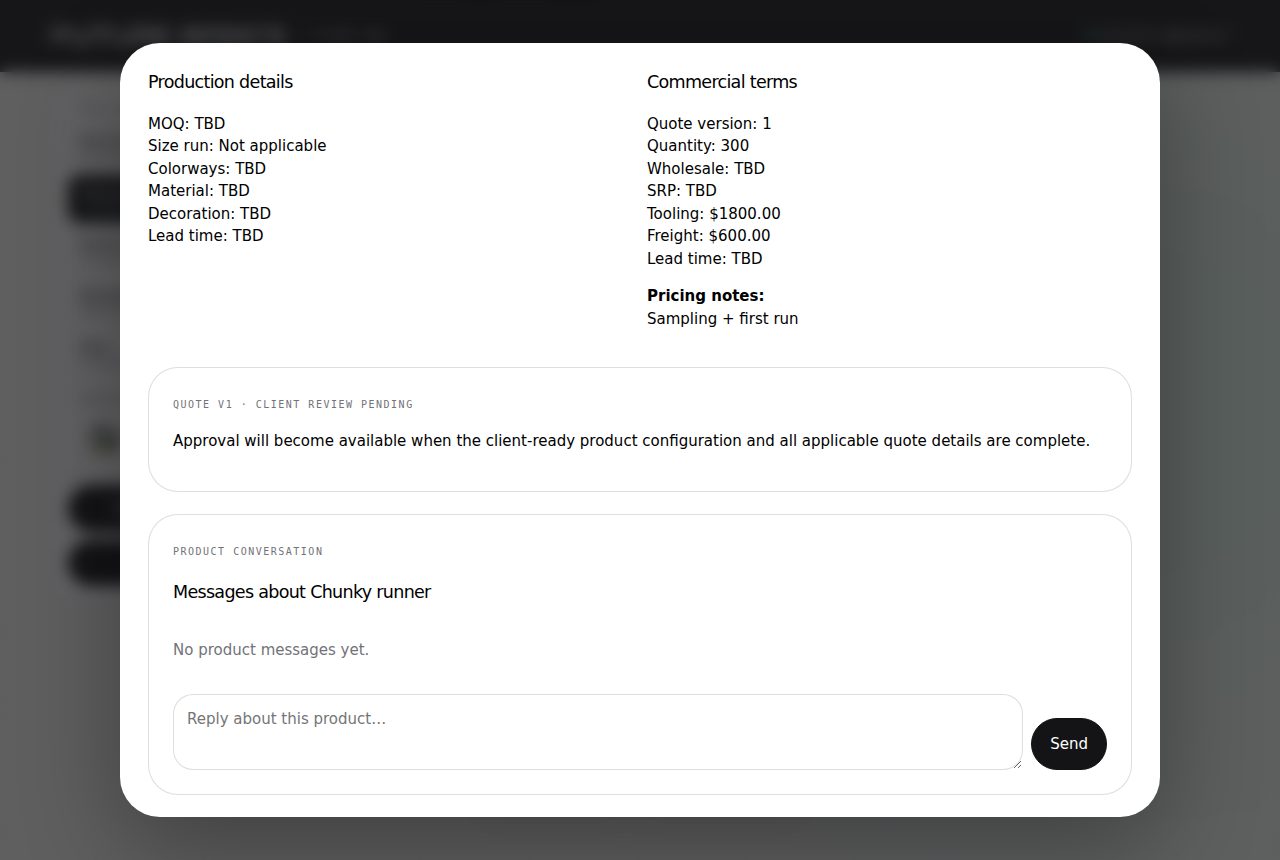
Once v1 is approved, we issue a quote for sampling on the product's page in your room — quantity, unit cost, tooling and freight. Press Approve quote.

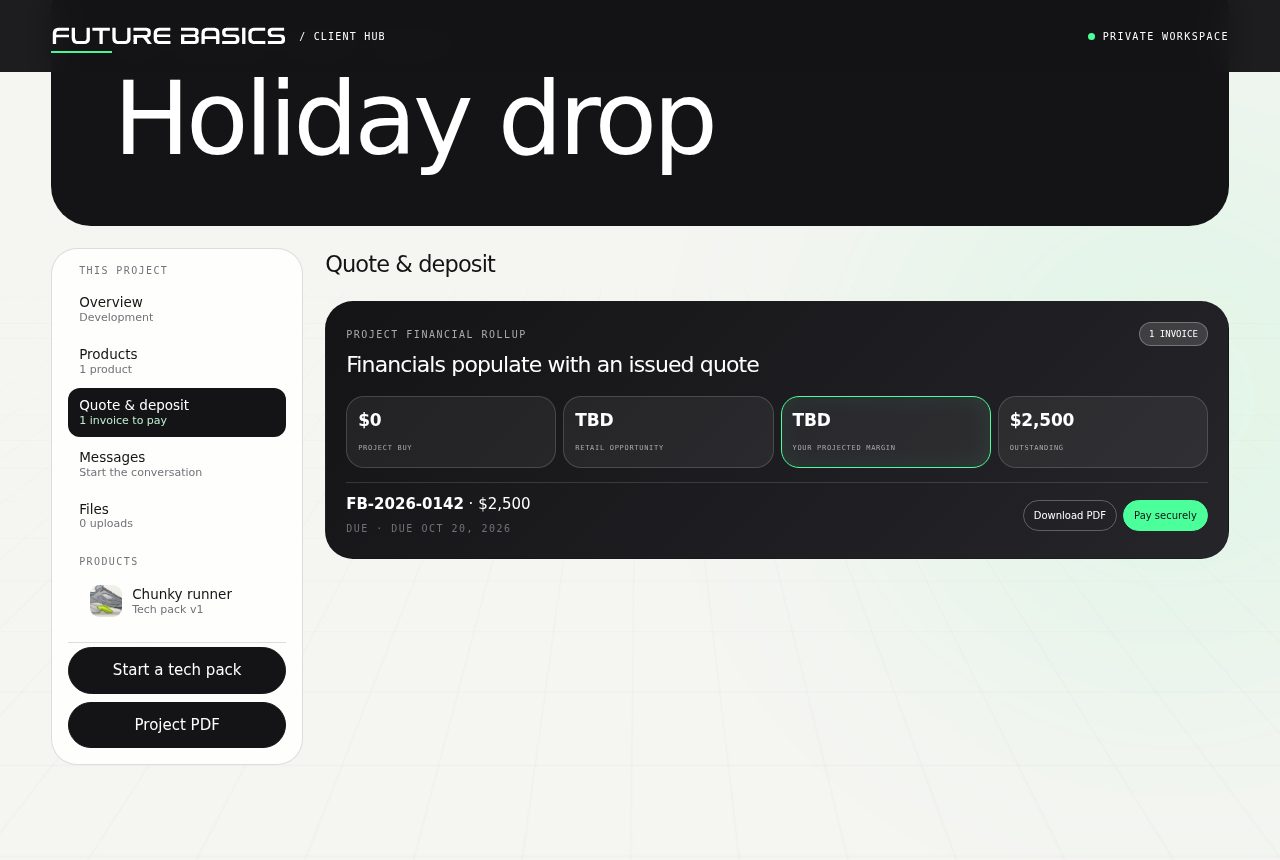
The deposit invoice then appears under Quote & deposit in the project's side bar, with Download PDF and a Pay link. Sampling starts when the deposit is paid; the invoice shows as paid in your room.

The quote card on a product page
Quote
The project financial rollup with a due deposit invoice
Deposit invoice
Step 10

Sampling

The factory works from the published tech pack through a private link: it acknowledges every callout and countersigns. With every signature in, the pack locks — any change after that is a new version, and the chain starts again.

You follow progress in the project room: messages, files, milestones and the sample photos as they arrive.

The sign-off chain
YouSubmit the draft
Future BasicsFinish and publish v1
YouApprove and sign v1
Future BasicsQuote, then sign
YouPay the sample deposit
FactoryAcknowledge callouts, countersign, sample
What the assistant drafts

From one photo

Product and categoryWhat it is, its construction and signature details, in two to four sentences.
Callouts with close-upsEight to twelve details pinned on the photo, each with a crop, a spec and a factory note.
MeasurementsThe right template for the product type, filled for the sample size and graded across the run, with the basis stated.
Materials and trimsBest-practice defaults for the product type, marked as defaults to confirm.
ConstructionHow it is made, step by step, in factory language.
ColoursObserved colours with hex and Pantone TCX references, plus suggested alternatives flagged as suggestions.
Care and notesCare instructions, assumptions, what the photo does not show, and open questions for you.
Clean referenceThe product is cropped out of the screenshot for the cover and tiles; your original stays as a view.
FAQ

Questions we get

Do I need an account to start?

No. Open /start, add a screenshot and your email, and your room is created with your first tech pack in it. The next time you come back, we email you a six-digit code — there are no passwords.

What kind of photo works best?

One product, filling most of the frame, side-on if it is footwear. Screenshots from Instagram or Pinterest are fine: app bars and captions are trimmed off automatically, and the assistant crops to the product. You can add up to four images; the first is the main view, the rest are detail views.

How long does the draft take?

Usually under two minutes. The banner reads “Building your tech pack…”; the editor is read-only while the assistant works and unlocks the moment the draft lands. If it takes longer than three minutes, editing opens anyway and the draft merges in when it arrives.

Will I lose what I typed if the assistant is still working?

No. Anything you type wins: your edits are kept field by field, your callouts come first, and the assistant's are added around them.

It says the photo could not be read. Now what?

The banner tells you why. Swap the photo under Callouts → View settings → Replace image, then press Try again (up to three times). You will also get an email with the same guidance, and we are notified so we can help. Or just reply to the email with a better picture and we take it from there.

I uploaded the wrong photo. Can I swap it?

Yes, at every stage. Before you create the draft, press the × on the thumbnail. In the editor, press the × in the corner of the photo under Callouts: the photo clears, the drop zone comes back, and the callouts stay listed (unpinned) until the right photo is in. A new first photo offers to have the assistant read it again; anything you typed is kept.

Where do measurements come from when the photo cannot show them?

From the same or comparable styles online. The assistant identifies the product, looks up retailer listings, brand size charts and lab measurements, converts to inches for your sample size, and lists every source under Notes to factory. Rows it cannot anchor are left open rather than guessed, and nothing is final until a physical sample confirms it.

Is the draft accurate?

It is a strong starting point, not a spec. Measurements are read from the photo's proportions and anchored to category norms; materials are best-practice defaults. Every value is labelled as a draft, and nothing is released to a factory until you, Future Basics and the factory have all signed.

Can I start a tech pack without a photo, or add sketches later?

Yes. Press Create blank draft to get the empty template, and add views under Callouts at any time. Future Basics can also run the assistant on a pack later once a photo or sketch is on it.

What happens after I submit?

We review it, complete anything missing, and publish version 1 to your room, usually within two business days. You get an email. The draft is read-only while we work; message us in the project thread if you need it back.

How do I approve and sign?

Open the published tech pack, go to the Sign tab, type your full name and press Approve. That is your signature. The chain is you → Future Basics → factory; every signature in locks the pack.

What does a tech pack cost?

Your first tech pack is free. After that, each pack is $48, or the studio membership is $100 a month for unlimited packs, re-runs and factory exports. The price covers the assistant's draft from your photo and Future Basics' review and v1 publish; you can fill a draft in by hand at no cost, and unlock it when you are ready to submit. Once a project in your room has a paid sample deposit, every pack is included. Payment is through Shopify checkout; the assistant starts the moment it clears.

When do I pay for sampling, and how much?

Review of your submitted pack costs nothing. After you approve v1 we issue a quote for sampling on the product page. Approve the quote and the deposit invoice appears in the project's financial rollup with a PDF and a Pay link. Sampling starts once the deposit is paid. Production terms follow the sample.

I want to change something after signing.

Tell us in the project thread. Any change to a signed pack is published as a new version, and the approvals start again so everyone signs what the factory will actually make.

Who can see my tech pack?

You and Future Basics. Factories only ever see the published version, through private links we create and can revoke at any time. They never see your drafts or your room.

Will the factory understand it?

Yes. Factory links carry the published pack with every callout, measurement and material, and Future Basics can hand it over in Mandarin, Spanish, Portuguese or Italian with one press. Codes, numbers and Pantone references stay as written.

What are colour renderings?

Photo-realistic views of your product in each colourway, made by Future Basics from the Pantone selections in the pack. The first one becomes the cover of the tech pack and the image on your project tiles.

Can I get a PDF?

Yes. Press PDF in the tech pack's top bar to print the whole pack. Project collections and invoices also download as PDFs from the project page.

I started one and never came back. What happens?

We send one reminder a few hours later with the link to your draft. Reply to that email with what you want made and we build the tech pack for you.

The screenshot is of another brand's product. Is that a problem?

Reference photos are for inspiration. The assistant describes construction generically and never copies logos or trademarks; the tech pack is for your original product. Tell us what to keep and what to change.

Does this work on my phone?

It is built for it. Pins show as numbers; tap one to open its card. Tables become cards. Screenshots upload straight from your camera roll.

Need a hand?

Message us in any project thread in your room, or reply to any email from us. If something in a draft looks wrong, tell us there — we fix it with you before anything goes to a factory.

Start a tech pack Sign in